 Word Processing Skills
Word Processing Skills
Word Processing Skillsparagraph mark | paragraph spacing | indenting paragraphs | a first_line indent |
examples of paragraph indentation | line spacing | controlling paragraphs | page margins
Paragraph mark
When you open a new, blank document and click Show/Hide

on the Standard toolbar, you see the insertion point followed by a paragraph mark
When you press ENTER to end one paragraph and begin another, the resulting new paragraph has the same characteristics as the previous one. For example, to make all the body paragraphs in your term paper left-aligned and double-spaced, you only have to set those attributes for the first paragraph. Pressing ENTER carries the formatting over to the next paragraph.
You can hide or show paragraph marks and other formatting marks by clicking Show/Hide
Return to top
Changing the space between paragraphs
Many factors determine how text is positioned. Margins determine the distance from the edge for all the text on a page, while paragraph indentation and alignment determines how paragraphs fit between the margins. You can also determine how much space occurs between lines, and before and after paragraphs.
Positioning and aligning text
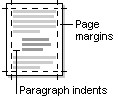
Margins determine the overall width of the main text area — in other words, the space between the text and the edge of the page.
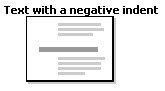
Indentation determines the distance of the paragraph from either the left or right margins. Within margins, you can increase or decrease the indentation of a paragraph or group of paragraphs. You can also create a negative indent (also known as an outdent), which pulls the paragraph out toward the left margin. You can also create a hanging indent, in which the first line of the paragraph is not indented, but subsequent lines are.
Horizontal alignment determines the appearance and orientation of the edges of the paragraph: left-aligned, right-aligned, centred, or justified. For example, in a left-aligned paragraph (the most common alignment), the left edge of the paragraph is flush with the left margin.
- Vertical alignment determines the paragraph's position relative to the top and bottom margins. This is useful, for example, when you’re creating a title page, because you can position text precisely at the top or centre of the page, or justify the paragraphs so that they’re spaced evenly down the page.
Return to top
Indenting Paragraphs
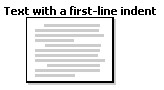
You can indent a single line in a paragraph to set it off from the rest of the paragraph. It's common to create a first-line indent, which moves the first line of a paragraph in by a specified distance but leaves the rest of the paragraph where it is. You can also create a hanging indent, in which the first line of the paragraph is not indented, but subsequent lines are.
You can set the indentation of individual lines by using the horizontal ruler, by using the Indents and Spacing tab (Format menu, Paragraph command), or by using Click and Type.
You can also indent text by using tab stops. Tab stops are best used for formatting single lines of text, especially when you want to set tab stops with leader characters. Tab stops are not recommended for creating complex elements such as columns or tables.
Return to top
A first-line indent
- Select the paragraph you want to indent.
- If you don't see the horizontal ruler, click Ruler on the View menu.
- On the horizontal ruler, drag the First Line Indent marker to the position where you want the text to start.

Return to top
Examples of paragraph indentation
Text with a first-line indent
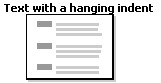
Text with a hanging indent. Hanging indents are frequently used for bibliographic entries, glossary terms, resumes and bulleted and numbered lists
Text with a negative indent. Use the By box on the Indents and Spacing tab (Format => Paragraph) to create a first line or hanging indent within a paragraph that has a negative indent.
Return to top
Line Spacing
Types of line spacing
Single Accommodates the largest font in that line, plus a small amount of extra space. The amount of extra space varies depending on the font used. 1.5 lines One-and-one-half times that of single line spacing. Double Twice that of single line spacing. At least Minimum line spacing that is needed to fit the largest font or graphic on the line. Exactly Fixed line spacing that Microsoft Word does not adjust Multiple Line spacing that is increased or decreased by a percentage that you specify. For example, setting line spacing to 1.2 will increase the space by 20 percent. Return to top
Controlling paragraphs
Keep lines of a paragraph together on a page or in a column
Keep paragraphs together on a page or in a column
Always force a page break before a paragraph
Control widow and orphan lines
Return to top
Page margins
Page margins are the blank space around the edges of the page. In general, you insert text and graphics in the printable area inside the margins. However, you can position some items in the margins — for example, headers, footers, and page numbers.
Microsoft Word offers several page margin options. You can:
Use the default page margins or specify your own.
Add margins for binding. Use a gutter margin to add extra space to the side or top margin of a document you plan to bind. A gutter margin ensures that text isn't obscured by the binding.
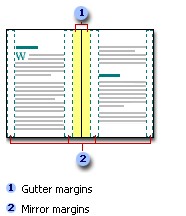
Set margins for facing pages. Use mirror margins to set up facing pages for double-sided documents, such as books or magazines. In this case, the margins of the left page are a mirror image of those of the right page (that is, the inside margins are the same width, and the outside margins are the same width).
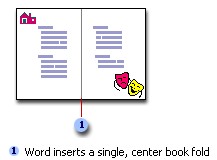
Add a book fold. Using the Book fold option in the Page Setup dialog box, you can create a menu, invitation, event program, or any other type of document that uses a single center fold.
Once you set up a document as a booklet, you work with it just as you would any document, inserting text, graphics, and other visual elements.
Change page margins
On the File menu, click Page Setup, and then click the Margins tab.
Under Margins, select the options you want.
Note To change the default margins, click Default after you select new margin settings. The new default settings are saved in the template on which the document is based. Each new document based on that template automatically uses the new margin settings.
You can also do one of the following:
Set mirror margins for facing pages
Margins of the left page are a mirror image of those on the right page. That is, the inside margins are the same width, and the outside margins are the same width.
- On the File menu, click Page Setup, and then click the Margins tab.
- In the Multiple pages list, select Mirror margins.
- In the Inside and Outside boxes, enter values for the mirror margins.
Set gutter margins for bound documents
A gutter margin setting adds extra space to the side or top margin of a document you plan to bind. A gutter margin ensures that text isn't obscured by the binding.
- On the File menu, click Page Setup, and then click the Margins tab.
- In the Gutter box, enter a value for the gutter margin.
- In the Gutter position box, click Left or Top.
Note To change the margins for part of a document, select the text, and then set the margins you want. In the Apply to box, click Selected text. Microsoft Word automatically inserts section breaks before and after the text with the new margin settings. If your document is already divided into sections, you can click in a section or select multiple sections, and then change the margins.
Return to top